Revit Interface Basics Explained | Easy Guide for New Users
To beginners in Revit, learning about the Revit environment is crucial for efficient modeling and project organization. Let me start with a brief introduction for your easy understanding.
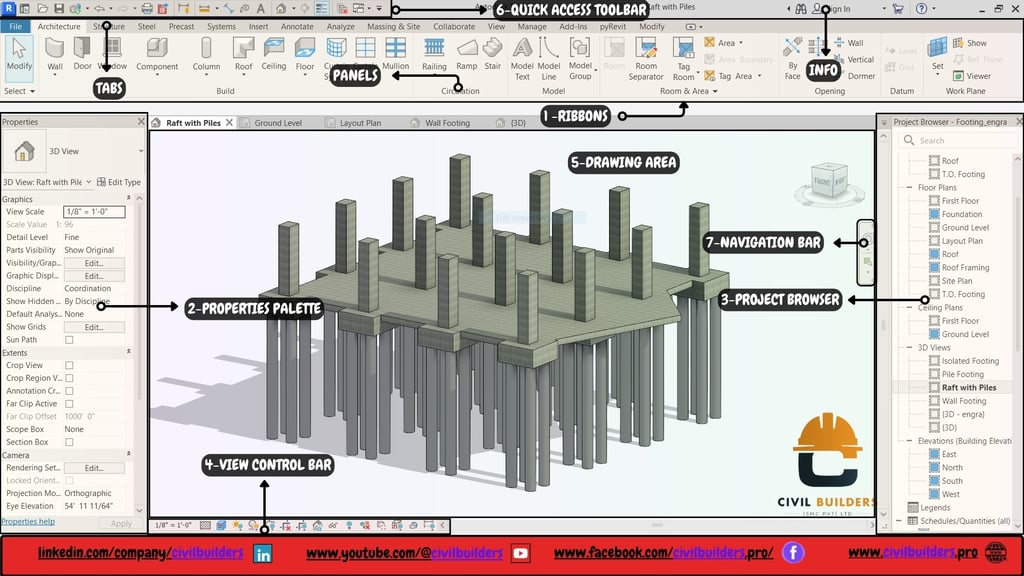
Key Areas of the Revit Interface
Once your project is open, you’ll notice the interface is divided into several key areas:
• The Ribbon:
Located at the top, the Ribbon houses tabs like 'Architecture,' 'Structure,' and 'Annotate,' each containing tools for different tasks.
• Properties Palette:
Next to the Project Browser, the Properties Palette lets you modify properties of selected elements or views.
• Project Browser:
On the left, this vertical panel acts like a table of contents, allowing you to easily navigate through your project’s views, sheets, and families.
• View Control & Navigation Bar:
At the bottom of the Drawing Area, the View Control Bar lets you adjust how your model is displayed, while the Navigation Bar helps you move around your design.
• Drawing Area:
The central workspace where your model takes shape. This is where you’ll create and interact with your project elements.
• Quick Access Toolbar:
At the top, this customizable toolbar provides one-click access to frequently used tools like 'Save,' 'Undo,' and 'Redo.'
Why This Matters
Knowing your way around the Revit interface makes it easier to work efficiently and focus on what’s important—bringing your design ideas to life.
Follow Civil Builders:
🌐 Website: www.civilbuilders.pro
🔗 LinkedIn: linkedin.com/company/civilbuilders
📘 Facebook: facebook.com/civilbuilders.pro
📺 YouTube: youtube.com/@CivilBuilders
🔔 Subscribe Now to never miss out on the latest Revit tutorials and civil engineering insights!